As you may or may not know, I LOVE (and by love, I mean adore with most all of my being) tacos! I loved taco night growing up, I am always up for a Mexican restaurant, when I worked at a summer camp, Taco Tuesday was my favorite night. I'm telling you... I. Love. Tacos!
I am always looking for new ways to prepare my tacos and 'spice it up' a bit. Taco Ring (find the recipe HERE) is a staple at my house. I love that stuff! Recently I found a recipe for a Taco Pie and I just had to try it.
Here's how I did it...
Showing posts with label simple. Show all posts
4.20.2012
3.31.2012
Goals Scrambled. Outcome: Scrabble!
My husband's best friend is getting married...TODAY! We drove from Florida up to Northern Virgina for the special day. I knew that I wanted to make the couple something rather than buy it...I'm that kind of gal.
I just knew the scrabble tile pillows I keep seeing all over Pinterest would be the perfect little gift for this funky fun couple.
Here's how I did it...
3.25.2012
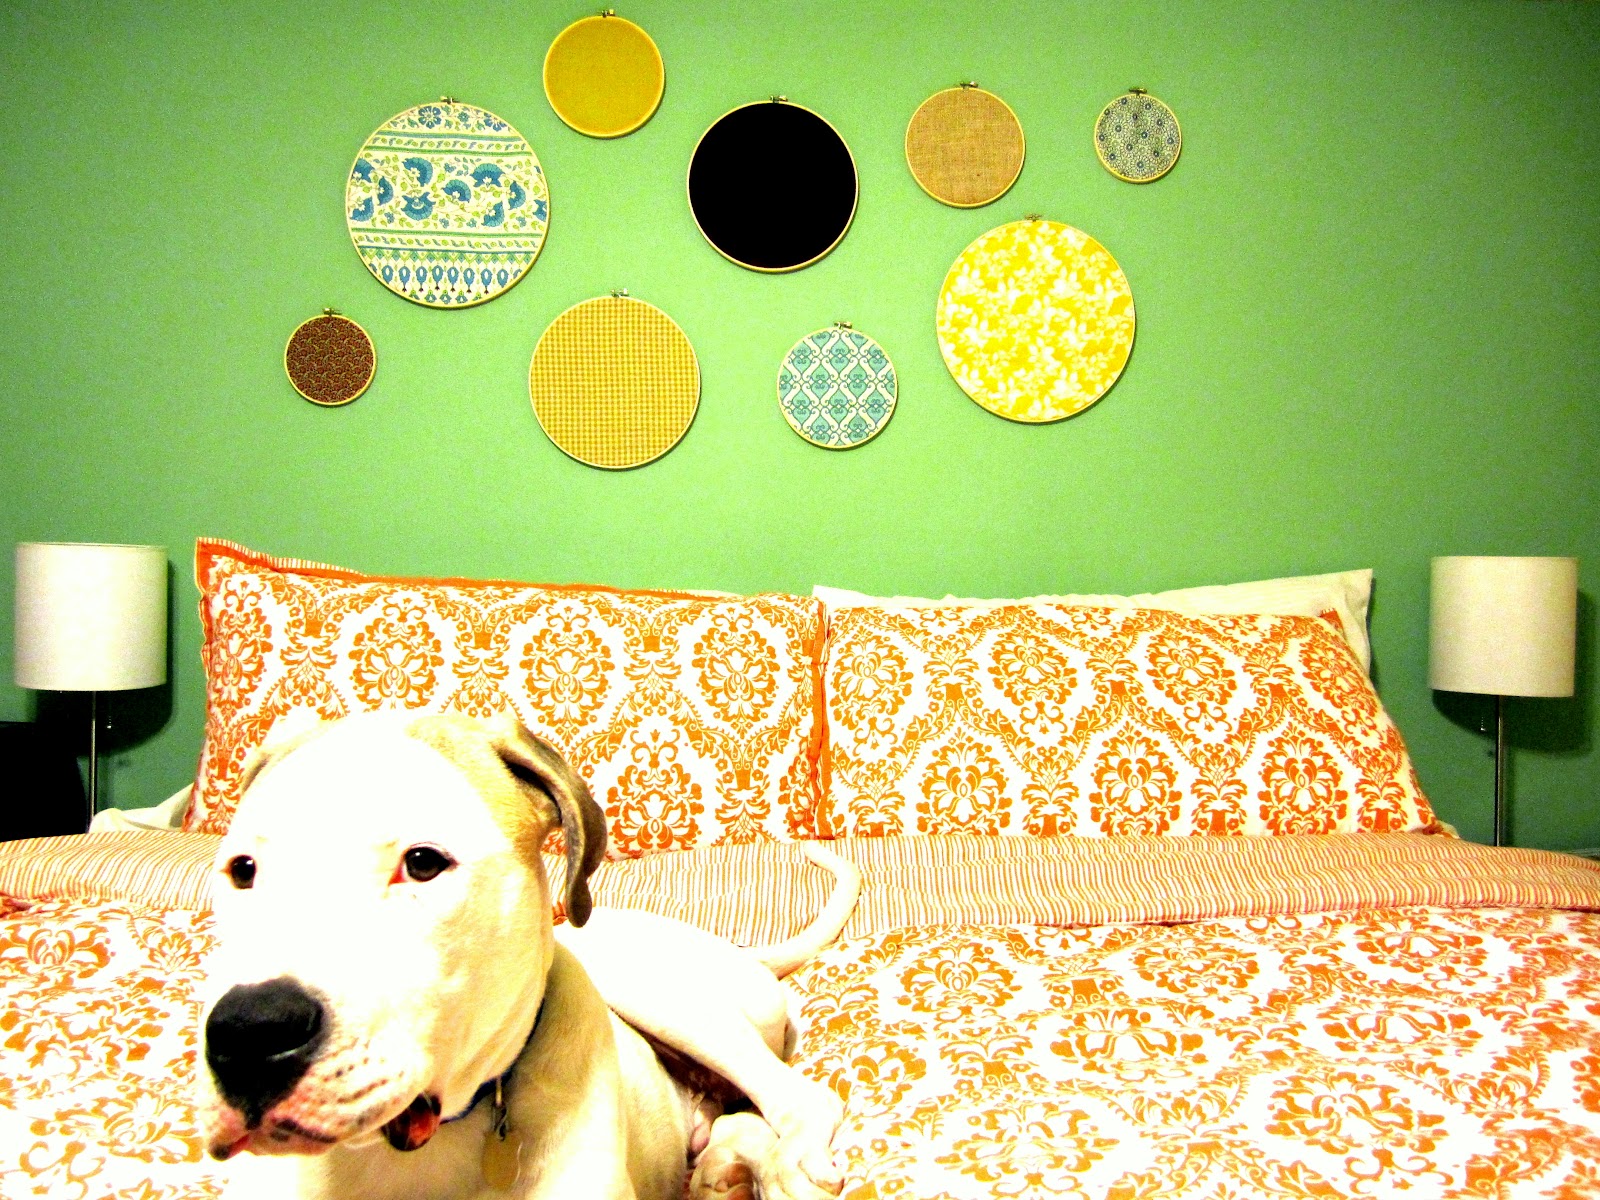
embriodery hoop art
We've recently moved into a new place and we got to paint the walls...ALL the walls! Our landlord agreed to pay for the paint (the place needed a fresh coat) if my husband and I would paint the walls.
We jumped on that chance and chose Sherwin Williams 'Blonde' for most all of the walls. Though, for the kitchen we went with Sherwin Williams Nurture Green. I loved it so much that I decided to do an accent wall in the bedroom in it. I love love love how it looks with our orange bedspread (picked up on clearance for $45 at Target).
There is a soffit above the bed and I knew that I wanted to put some sort of art on that wall. We do not have a bed frame, so a headboard wasn't going to work plus I didn't want anything too bulky. I remembered some simple art I saw on pinterest. I absolutely love how it turned out...here's how I did it...
We jumped on that chance and chose Sherwin Williams 'Blonde' for most all of the walls. Though, for the kitchen we went with Sherwin Williams Nurture Green. I loved it so much that I decided to do an accent wall in the bedroom in it. I love love love how it looks with our orange bedspread (picked up on clearance for $45 at Target).
There is a soffit above the bed and I knew that I wanted to put some sort of art on that wall. We do not have a bed frame, so a headboard wasn't going to work plus I didn't want anything too bulky. I remembered some simple art I saw on pinterest. I absolutely love how it turned out...here's how I did it...
3.09.2012
FOODIE FRIDAY: Potato Cakes
I knew it was simple...but I didn't realize it was THIS simple! I customized my cakes a wee bit more than my grandma would have...but, she wasn't married to a Puerto Rican who LOVES seasoning!
Here's how I did it...
3.04.2012
German Chocolate Cake Frosting
Yesterday I shared with you the recipe I used to make German chocolate cupcakes. Today, it's the frosting.
This recipe was so simple and did not take long to make at all. The ingredients are common and nothing crazy that I would never use again.
I made cupcakes rather than a layered cake. So, I decided to cut my cupcakes in half and put a layer of frosting between the two 'layers' of cake.
Here's how I did it...
2.29.2012
Quick Trick: Buttermilk Substitute
While baking the other day I found a recipe which called for buttermilk. I don't just have buttermilk on hand and I didn't want to buy a whole half gallon to only use a cup of it.
Than low and behold I found a substitute for buttermilk and I was shocked at how simple it was!
Add one tablespoon of lemon juice or vinegar to one cup of milk and let sit for ten minutes.
I had lemon juice handy and used that.
It worked like a charm! I was quite impressed and so relieved that I didn't have to go buy another ingredient. Oh, and no one could taste the difference!
Check out what I made using this little trick!
Than low and behold I found a substitute for buttermilk and I was shocked at how simple it was!
Add one tablespoon of lemon juice or vinegar to one cup of milk and let sit for ten minutes.
I had lemon juice handy and used that.
It worked like a charm! I was quite impressed and so relieved that I didn't have to go buy another ingredient. Oh, and no one could taste the difference!
Check out what I made using this little trick!
2.04.2012
PI&DI: loaded potato soup
I know it's been a while since I've posted a 'Foodie Friday' post but trust me, this one is worth the wait!
I wanted a quick meal that was yummy and satisfying...but most importantly warm! It was one of those super cold and rainy days where you just want to curl up and do nothing...but when you're moving in less than a week that's just not going to happen!
I found a recipe for homemade loaded bakes potato soup on Pinterest and I've made it a few times. I know I haven't posted it, I have made it a few different ways and want to perfect it before I share with you bloggies!
This soup took me about fifteen minutes to cook and left me plenty of time to pack. Here's how I did it...
I wanted a quick meal that was yummy and satisfying...but most importantly warm! It was one of those super cold and rainy days where you just want to curl up and do nothing...but when you're moving in less than a week that's just not going to happen!
I found a recipe for homemade loaded bakes potato soup on Pinterest and I've made it a few times. I know I haven't posted it, I have made it a few different ways and want to perfect it before I share with you bloggies!
This soup took me about fifteen minutes to cook and left me plenty of time to pack. Here's how I did it...
1.22.2012
PI&DI - Scarf Hanger
While on Pinterest one day I found this...what an awesome idea!
I had all of the supplies on hand so for me, this solution was FREE!! Who doesn't love a free project?
All you need is a hanger and some shower curtain rings...
Here's how I did it...
10.19.2011
pinned it and did it - weekly board
All righty, I can check one more Pinterest pin off my 'to craft' list. I love to reuse items I already have...it makes me feel so accomplished in having something new that I didn't have to pay for!
Today I have something that I am so excited to start using. I love organization (my mom is chucking right now) I'm just not so good at keeping up with it! I make a lot of lists and write things down. So, I knew that this would be perfect for me.
One of my favorite parts of this craft is the price tag...absolutely nothing! Here's how I did it...
Today I have something that I am so excited to start using. I love organization (my mom is chucking right now) I'm just not so good at keeping up with it! I make a lot of lists and write things down. So, I knew that this would be perfect for me.
One of my favorite parts of this craft is the price tag...absolutely nothing! Here's how I did it...
10.17.2011
pinned it and did it - pencil vase
My best friend is a teacher and there is no one I like making things for more than my BFF! I found the perfect idea on Pinterest for a pencil vase and just HAD to whip one up.
This was so incredibly simple to make and really did not take much time at all. What a great Teacher Appreciation gift, Christmas or even end of the year gift.
My favorite part of the project was the price...under $5!
Here's how I did it..
This was so incredibly simple to make and really did not take much time at all. What a great Teacher Appreciation gift, Christmas or even end of the year gift.
My favorite part of the project was the price...under $5!
Here's how I did it..
10.16.2011
pinned it and did it - makeup brush storage
As I mentioned before, Pinterest is a HUGE addiction that I've fallen in to! All of the creative ideas and tips are unbelievable...I'm SO hooked. I have gotten SO many great ideas for simple and inexpensive crafts and organization. I also have found quite few pictures of some gorgeous clothes, bags, shoes and living spaces...being such a visual person I am pretty much in love.
Today I want to share with you an awesome organizational idea that I found on Pinterest. It is a smart and simple way to store your makeup brushes. Here's how I did it...
9.02.2011
Foodie Friday: oreo filled brownies
Yes, you read that title correctly...brownies filled with Oreo cookies!
I was going to a girls craft day of sorts with some ladies from our church and wanted to bring something tasty...and wanted to make something new. I had already bought Oreo cookies thinking I would just make Oreo cheesecake cupcakes. Instead, I jumped onto Pinterest and sought out a simple Oreo recipe.
This is what I came up with...
I was going to a girls craft day of sorts with some ladies from our church and wanted to bring something tasty...and wanted to make something new. I had already bought Oreo cookies thinking I would just make Oreo cheesecake cupcakes. Instead, I jumped onto Pinterest and sought out a simple Oreo recipe.
This is what I came up with...
5.20.2011
blossoms above
Last summer, for my wedding I decided that I wanted to use tissue paper flowers as decorations. I watched a tutorial online and whipped up about 20 or so with the help of my sister and mom. They were SO easy to make and were so stinkin' cute when hung up! I loved these simply and SO inexpensive decorations. When it came time to plan my best friends bridal shower, I knew jut the thing for a fun POP of color!
5.18.2011
set the table
For smaller scale parties (baby showers, bridal showers, anniversary parties) I always want to do something special...I mean, these aren't your everyday birthday party. Though, as you know my goal is always to spend as little as possible without it looking like I did so!
When my bridesmaids and my mom threw my bridal shower last summer they invited me to help decorate the night before. Some may see this as odd...I LOVED it. Sitting at home knowing that they were decorating something and that I couldn't be a part of it would have KILLED me!! They came up with an idea that I think is just absolutely genus! I used this same idea in the decorating for my best friends bridal shower...trust me, you're going to LOVE it....and love the price tag!
5.16.2011
Clipped On
My best friend, Leslie has a favorite flower...SUNFLOWERS! However, I could not find any sunflowers that I liked enough to use as centerpieces. I was quite stumped and honestly...panicked! I knew that I needed something in the center of the tables, I just had no idea what.
Last summer, my bridesmaids (my older sister and Leslie) bought some glasses from Ikea that we used as vases for the centerpieces at both mine and my older sisters bridal showers. I wanted to use the glasses but, once again could not find flowers to suit my fancy. Then, about two days before the shower I had an idea...a great one, too!
I ran down to JoAnn's and picked up a package of 20 small dowel rods (wooden sticks) and a package of 24 mini clothes pins. I stopped at Wal-Mart and got some super glue and black spray paint. The total cost of my materials was under $10 and the outcome was quite dandy!
Last summer, my bridesmaids (my older sister and Leslie) bought some glasses from Ikea that we used as vases for the centerpieces at both mine and my older sisters bridal showers. I wanted to use the glasses but, once again could not find flowers to suit my fancy. Then, about two days before the shower I had an idea...a great one, too!
I ran down to JoAnn's and picked up a package of 20 small dowel rods (wooden sticks) and a package of 24 mini clothes pins. I stopped at Wal-Mart and got some super glue and black spray paint. The total cost of my materials was under $10 and the outcome was quite dandy!
5.02.2011
the 'everything stew' of appetizers
One night while sitting at home I decided I wasn't hungry enough for a whole meal...and didn't want to clean all the dishes that came with it. I decided I would make something light and quick. I had no idea what, though! What I did know was that I had some specific cravings...cheese, bacon and crescent rolls. So naturally, I decided to join the three and made a delicious little snack that I want to share with you!
Don't worry, I didn't eat ALL of them that night. What was left my brother-in-law and two sister-in-laws heated up and ate. They even said they were good...so it's not just me!!
I can't wait to have a party of get together so that I can whip up this little treat to share with more people!
Here's how I did it:
Don't worry, I didn't eat ALL of them that night. What was left my brother-in-law and two sister-in-laws heated up and ate. They even said they were good...so it's not just me!!
I can't wait to have a party of get together so that I can whip up this little treat to share with more people!
Here's how I did it:
4.28.2011
thrifty thursday #7
I wanted some art for my guest bedroom. However, my funding was right at zero dollars and zero cents. I wanted to get something on the walls before my Mother-in-law came this weekend. I had to come up with something...and quick.
Finally, after much thought and deliberation a light bulb went off. I stopped at Home Depot on my way home from church and got my supplies. My total cost...NOTHING! That's right, you read correctly; nothing. No, I didn't get any discount...not even a five finger discount.
I did however, have to pay out for the frames for my project. Though, I didn't mind paying for those because they are something that I can use and reuse. Plus, I only spent $18 on the frames...doing a whole art project for under $20 is pretty good in my book. Also, if you had some old frames lying around the house you could always just spray paint them and get the same effect! Your costs could be much lower than mine...you could WIN!
Here's how I did it:
Finally, after much thought and deliberation a light bulb went off. I stopped at Home Depot on my way home from church and got my supplies. My total cost...NOTHING! That's right, you read correctly; nothing. No, I didn't get any discount...not even a five finger discount.
I did however, have to pay out for the frames for my project. Though, I didn't mind paying for those because they are something that I can use and reuse. Plus, I only spent $18 on the frames...doing a whole art project for under $20 is pretty good in my book. Also, if you had some old frames lying around the house you could always just spray paint them and get the same effect! Your costs could be much lower than mine...you could WIN!
Here's how I did it:
4.26.2011
hung up on organization
I showed you the changes to my craft room this past week on Friday update. Now it's time to show you how I made that magnificent (not-so-)little memo board.
I knew I would need something that could house all of my inspiration and papers in my craft room. I just wanted something that would be pretty and personalized to do it. I knew right away that I would need a memo board of some type. I have made memo boards before and they are SO simple.
The hardest part of this project was finding the right fabric...and frame, I'm quite picky about my frames!
I knew I would need something that could house all of my inspiration and papers in my craft room. I just wanted something that would be pretty and personalized to do it. I knew right away that I would need a memo board of some type. I have made memo boards before and they are SO simple.
The hardest part of this project was finding the right fabric...and frame, I'm quite picky about my frames!
4.21.2011
Thrifty Thursday #6
Sorry this one is coming so late in the day...I may or may not have spent some time at the pool this morning! I got two letters from my husband who is away at Basic Training for the Air Force, YAY!
This Thursday I've got something that ANYONE can do, and I mean it. As long as you can operate a standard electric iron, you can complete this project. Earlier this week I posted about some curtains I helped a friend make for her living room, well I came home and HAD to make some of my own.
4.18.2011
the proof is in the pudding....err, pictures
Recently, a friend asked me for some help with curtains for her living room. As I stated before 'no one likes naked windows'. She has a rental apartment as do I, and when you are renting it's hard to personalize a space. It's especially hard to make the place seem like yours and not just a standard rental space.
The one thing that will make the most impact with the least amount of effort it curtains. Most rental spaces come with blinds but adding curtains will really dress up the space.
Subscribe to:
Posts (Atom)