We've recently moved into a new place and we got to paint the walls...ALL the walls! Our landlord agreed to pay for the paint (the place needed a fresh coat) if my husband and I would paint the walls.
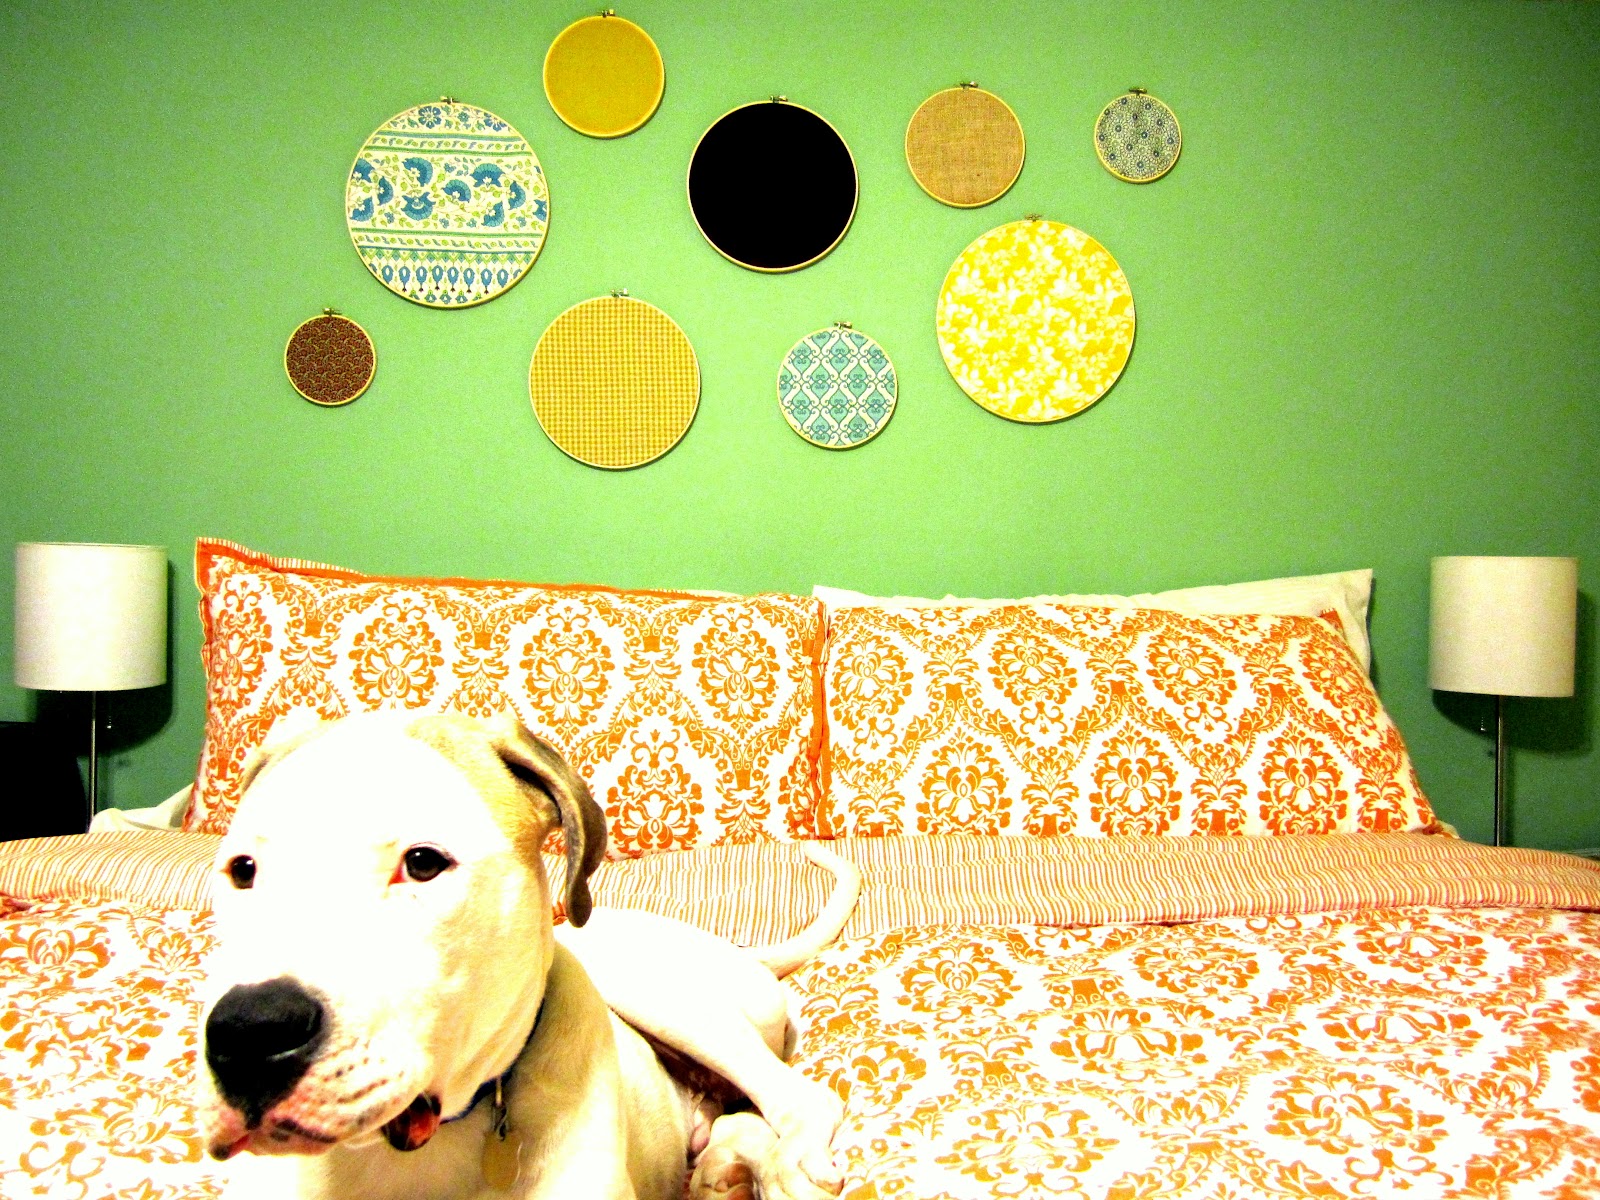
We jumped on that chance and chose Sherwin Williams 'Blonde' for most all of the walls. Though, for the kitchen we went with Sherwin Williams Nurture Green. I loved it so much that I decided to do an accent wall in the bedroom in it. I love love love how it looks with our orange bedspread (picked up on clearance for $45 at Target).
There is a soffit above the bed and I knew that I wanted to put some sort of art on that wall. We do not have a bed frame, so a headboard wasn't going to work plus I didn't want anything too bulky. I remembered some simple art I saw on pinterest. I absolutely love how it turned out...here's how I did it...
Showing posts with label inexpensive. Show all posts
3.25.2012
1.22.2012
PI&DI - Scarf Hanger
While on Pinterest one day I found this...what an awesome idea!
I had all of the supplies on hand so for me, this solution was FREE!! Who doesn't love a free project?
All you need is a hanger and some shower curtain rings...
Here's how I did it...
10.19.2011
pinned it and did it - weekly board
All righty, I can check one more Pinterest pin off my 'to craft' list. I love to reuse items I already have...it makes me feel so accomplished in having something new that I didn't have to pay for!
Today I have something that I am so excited to start using. I love organization (my mom is chucking right now) I'm just not so good at keeping up with it! I make a lot of lists and write things down. So, I knew that this would be perfect for me.
One of my favorite parts of this craft is the price tag...absolutely nothing! Here's how I did it...
Today I have something that I am so excited to start using. I love organization (my mom is chucking right now) I'm just not so good at keeping up with it! I make a lot of lists and write things down. So, I knew that this would be perfect for me.
One of my favorite parts of this craft is the price tag...absolutely nothing! Here's how I did it...
10.17.2011
pinned it and did it - pencil vase
My best friend is a teacher and there is no one I like making things for more than my BFF! I found the perfect idea on Pinterest for a pencil vase and just HAD to whip one up.
This was so incredibly simple to make and really did not take much time at all. What a great Teacher Appreciation gift, Christmas or even end of the year gift.
My favorite part of the project was the price...under $5!
Here's how I did it..
This was so incredibly simple to make and really did not take much time at all. What a great Teacher Appreciation gift, Christmas or even end of the year gift.
My favorite part of the project was the price...under $5!
Here's how I did it..
10.16.2011
pinned it and did it - makeup brush storage
As I mentioned before, Pinterest is a HUGE addiction that I've fallen in to! All of the creative ideas and tips are unbelievable...I'm SO hooked. I have gotten SO many great ideas for simple and inexpensive crafts and organization. I also have found quite few pictures of some gorgeous clothes, bags, shoes and living spaces...being such a visual person I am pretty much in love.
Today I want to share with you an awesome organizational idea that I found on Pinterest. It is a smart and simple way to store your makeup brushes. Here's how I did it...
5.20.2011
blossoms above
Last summer, for my wedding I decided that I wanted to use tissue paper flowers as decorations. I watched a tutorial online and whipped up about 20 or so with the help of my sister and mom. They were SO easy to make and were so stinkin' cute when hung up! I loved these simply and SO inexpensive decorations. When it came time to plan my best friends bridal shower, I knew jut the thing for a fun POP of color!
5.18.2011
set the table
For smaller scale parties (baby showers, bridal showers, anniversary parties) I always want to do something special...I mean, these aren't your everyday birthday party. Though, as you know my goal is always to spend as little as possible without it looking like I did so!
When my bridesmaids and my mom threw my bridal shower last summer they invited me to help decorate the night before. Some may see this as odd...I LOVED it. Sitting at home knowing that they were decorating something and that I couldn't be a part of it would have KILLED me!! They came up with an idea that I think is just absolutely genus! I used this same idea in the decorating for my best friends bridal shower...trust me, you're going to LOVE it....and love the price tag!
5.16.2011
Clipped On
My best friend, Leslie has a favorite flower...SUNFLOWERS! However, I could not find any sunflowers that I liked enough to use as centerpieces. I was quite stumped and honestly...panicked! I knew that I needed something in the center of the tables, I just had no idea what.
Last summer, my bridesmaids (my older sister and Leslie) bought some glasses from Ikea that we used as vases for the centerpieces at both mine and my older sisters bridal showers. I wanted to use the glasses but, once again could not find flowers to suit my fancy. Then, about two days before the shower I had an idea...a great one, too!
I ran down to JoAnn's and picked up a package of 20 small dowel rods (wooden sticks) and a package of 24 mini clothes pins. I stopped at Wal-Mart and got some super glue and black spray paint. The total cost of my materials was under $10 and the outcome was quite dandy!
Last summer, my bridesmaids (my older sister and Leslie) bought some glasses from Ikea that we used as vases for the centerpieces at both mine and my older sisters bridal showers. I wanted to use the glasses but, once again could not find flowers to suit my fancy. Then, about two days before the shower I had an idea...a great one, too!
I ran down to JoAnn's and picked up a package of 20 small dowel rods (wooden sticks) and a package of 24 mini clothes pins. I stopped at Wal-Mart and got some super glue and black spray paint. The total cost of my materials was under $10 and the outcome was quite dandy!
4.28.2011
thrifty thursday #7
I wanted some art for my guest bedroom. However, my funding was right at zero dollars and zero cents. I wanted to get something on the walls before my Mother-in-law came this weekend. I had to come up with something...and quick.
Finally, after much thought and deliberation a light bulb went off. I stopped at Home Depot on my way home from church and got my supplies. My total cost...NOTHING! That's right, you read correctly; nothing. No, I didn't get any discount...not even a five finger discount.
I did however, have to pay out for the frames for my project. Though, I didn't mind paying for those because they are something that I can use and reuse. Plus, I only spent $18 on the frames...doing a whole art project for under $20 is pretty good in my book. Also, if you had some old frames lying around the house you could always just spray paint them and get the same effect! Your costs could be much lower than mine...you could WIN!
Here's how I did it:
Finally, after much thought and deliberation a light bulb went off. I stopped at Home Depot on my way home from church and got my supplies. My total cost...NOTHING! That's right, you read correctly; nothing. No, I didn't get any discount...not even a five finger discount.
I did however, have to pay out for the frames for my project. Though, I didn't mind paying for those because they are something that I can use and reuse. Plus, I only spent $18 on the frames...doing a whole art project for under $20 is pretty good in my book. Also, if you had some old frames lying around the house you could always just spray paint them and get the same effect! Your costs could be much lower than mine...you could WIN!
Here's how I did it:
4.26.2011
hung up on organization
I showed you the changes to my craft room this past week on Friday update. Now it's time to show you how I made that magnificent (not-so-)little memo board.
I knew I would need something that could house all of my inspiration and papers in my craft room. I just wanted something that would be pretty and personalized to do it. I knew right away that I would need a memo board of some type. I have made memo boards before and they are SO simple.
The hardest part of this project was finding the right fabric...and frame, I'm quite picky about my frames!
I knew I would need something that could house all of my inspiration and papers in my craft room. I just wanted something that would be pretty and personalized to do it. I knew right away that I would need a memo board of some type. I have made memo boards before and they are SO simple.
The hardest part of this project was finding the right fabric...and frame, I'm quite picky about my frames!
4.21.2011
Thrifty Thursday #6
Sorry this one is coming so late in the day...I may or may not have spent some time at the pool this morning! I got two letters from my husband who is away at Basic Training for the Air Force, YAY!
This Thursday I've got something that ANYONE can do, and I mean it. As long as you can operate a standard electric iron, you can complete this project. Earlier this week I posted about some curtains I helped a friend make for her living room, well I came home and HAD to make some of my own.
4.18.2011
the proof is in the pudding....err, pictures
Recently, a friend asked me for some help with curtains for her living room. As I stated before 'no one likes naked windows'. She has a rental apartment as do I, and when you are renting it's hard to personalize a space. It's especially hard to make the place seem like yours and not just a standard rental space.
The one thing that will make the most impact with the least amount of effort it curtains. Most rental spaces come with blinds but adding curtains will really dress up the space.
4.08.2011
friday update #5
This weeks room isn't so much a room...it's a closet/hallway/wee little nook of our house.
I am going to share with you our laundry closet/hallway...nook...whatever! The hallway leading to our guest rooms and guest bathroom has a closet where the washer and dryer hook-ups are. We were SO excited to finally be able to do laundry at our house, on our schedule...for FREE! We went to Best Buy (hello, reward zone = points = gift certificates = a happy husband = a happy wife....got it?) and found the Samsung front loading washer and dryer of our dreams. God COMPLETELY and TOTALLY provided for us, allowing us to get them for a steal of a price...about 1/4 off of the budget we'd allowed for them.
When our new ''family members arrived to our new apartment, we set them right up in their new homes...and realized the stupid closet doors wouldn't shut. So, my husband took them off and now they are leaning against the wall in my craft room. The laundry/storage closet was completely open and viewable by all who walk past. I had to do something...it needed some prettying up.
I am going to share with you our laundry closet/hallway...nook...whatever! The hallway leading to our guest rooms and guest bathroom has a closet where the washer and dryer hook-ups are. We were SO excited to finally be able to do laundry at our house, on our schedule...for FREE! We went to Best Buy (hello, reward zone = points = gift certificates = a happy husband = a happy wife....got it?) and found the Samsung front loading washer and dryer of our dreams. God COMPLETELY and TOTALLY provided for us, allowing us to get them for a steal of a price...about 1/4 off of the budget we'd allowed for them.
When our new ''family members arrived to our new apartment, we set them right up in their new homes...and realized the stupid closet doors wouldn't shut. So, my husband took them off and now they are leaning against the wall in my craft room. The laundry/storage closet was completely open and viewable by all who walk past. I had to do something...it needed some prettying up.
3.22.2011
a hair(y) situation
A childhood friend contacted me through Facebook and inquired about me creating some wedding hair accessories for her big day. Of course, I was like "heck yes!" She showed me a picture of one she had seen in David's Bridal for a whopping $50 a pop! What? It absolutely irks me that businesses will hike up prices when they add 'wedding' or 'bridal' to a title knowing that people will pay the completely outrageous price because the sales people will sell them the line 'it's your special day, you deserve it'...you DO deserve it, but at a fair price! Whew...got that little rant session over with...now onto the post!
I took one look at the picture and knew that it would be a piece of cake...wedding cake, maybe?! Keep reading to see how I did it!
3.17.2011
thrifty thursday #2
What time is it?
TOOL TIME...uh, I mean Thrifty Thursday!
My husband and I hit the thrift sores and picked up a few things and even transformed one!
Last week we headed to our favorite thrift store to peruse the isles and see what goodies we could find. We stumbled upon some beauties! I spotted this gorgeous wine box, lying on the floor under a rack full of clothes for $5.
TOOL TIME...uh, I mean Thrifty Thursday!
My husband and I hit the thrift sores and picked up a few things and even transformed one!
Last week we headed to our favorite thrift store to peruse the isles and see what goodies we could find. We stumbled upon some beauties! I spotted this gorgeous wine box, lying on the floor under a rack full of clothes for $5.
3.09.2011
a little hung up
I wanted to fill up some wall space as well as free up some cabinet space at the same time. I decided to kick my coffee cups out of the cabinet! I love my dishes, I asked for them for Christmas before I had even moved out of my parent's house! I had dishes stored above the garage before I even had a place to use them. Though, I love the design and the color and am so glad I got them when I did because they are now discontinued.
I wanted to display some of my dishes, since they are the inspiration for the color scheme and decorating (which is still in the process). I decided using the coffee cups would be the easiest way to do that, here's what I did...
2.22.2011
dirty little secret
My husband and I are moving next weekend (one huge collective squeal, please)! We are so so so so so very excited, we are currently in a one bedroom, one bath apartment and we're busting at the seams. With all of my craft, sewing, decorating and other stuff and his love of 'things' we have outgrown this apartment. We're moving to a three bedroom, two bath apartment. Why three bedrooms you ask? So I can have a sewing/crafting room!
Any whoooo...our carpets in the current apartment have been through a lot. We didn't own a vacuum for quite a while (I know, gross...we registered for one, just never got it) About a month ago we finally bought our vacuum and it's like heaven...except for the realization of how gross our carpets are! The area right by the front door was the WORST! I was so embarrassed that I never really looked at it before and people came over and saw...ewwww! Well, if we wanted our deposit back, we needed to clean up our act...well, our carpets.
I work at a church cleaning at nights, the same time the carpet cleaning man works. He has a 'secret concoction' that he's used to clean floors in school buildings. I figure if it works for hundred of kids, it can work for my little carpet. The best part of this concoction is that it is made of simply household ingredients!
Any whoooo...our carpets in the current apartment have been through a lot. We didn't own a vacuum for quite a while (I know, gross...we registered for one, just never got it) About a month ago we finally bought our vacuum and it's like heaven...except for the realization of how gross our carpets are! The area right by the front door was the WORST! I was so embarrassed that I never really looked at it before and people came over and saw...ewwww! Well, if we wanted our deposit back, we needed to clean up our act...well, our carpets.
I work at a church cleaning at nights, the same time the carpet cleaning man works. He has a 'secret concoction' that he's used to clean floors in school buildings. I figure if it works for hundred of kids, it can work for my little carpet. The best part of this concoction is that it is made of simply household ingredients!
2.18.2011
hanging in there
My best friend went to Japan a few summers ago with her then boyfriend (he's her fiance now!) to visit his family and she brought me back a handkerchief that I loved! It was red (favorite color) with big graphic flowers on it...just the right amount of oriental-ness and vintage-esque for me to fall in love with. Well, I never quite knew what to do with it. I mean, I'm not the type to carry a hankie in my purse and I certainly didn't want to mess it up.I was stuck. So, the sweet handkerchief sat in my craft cart for a while.
Then one day a few weeks ago, a light bulb went off in my head! I was in need of a place to hang my necklaces...they were hanging in clear thumbtacks at the time. So, I used the handkerchief to make an awesome jewelry holder.
1.16.2011
blossom - episode 2
Yesterday I shared with you a no sew fabric flower (which I LOVE and probably will be obsessed with and make quite often)! Today I am going to show you a different type of fabric flower that requires VERY VERY minimal sewing. Honestly, it requires a needle and thread...come on, you can handle that.
These flowers can be made as big or as small as you want. You can glue a pin to the back or a hair clip, or even attach it to a headband for a super cute look. Use them as embellishments on different projects. Just add them everywhere!
You will start off with the same materials you did for the no sew flower (cut your fabric into circles) and just add to that list a needle and thread. Cut one smaller circle of a thick fabric for the base.
Start off by taking your fabric (the fabric I chose was printed on one side and I wanted the printed side to show most, so I started off with the printed side down) Fold the circle in half, then half again.
Now, position the point of the petal in the center of the base. Stitch from the bottom of the base through the point of the petal. Stitch back down through the point of the petal and the base.
Continue doing this with the remaining petals. I did three different fabrics and decided to layer each one separately. You can mix the patterns up, keep it all simple...do what ever you want!
Once you have all your petals on, cut a small circle out of a coordinating fabric and stitch it onto place in the center of your layered petals.
These flowers can be made as big or as small as you want. You can glue a pin to the back or a hair clip, or even attach it to a headband for a super cute look. Use them as embellishments on different projects. Just add them everywhere!
You will start off with the same materials you did for the no sew flower (cut your fabric into circles) and just add to that list a needle and thread. Cut one smaller circle of a thick fabric for the base.
Start off by taking your fabric (the fabric I chose was printed on one side and I wanted the printed side to show most, so I started off with the printed side down) Fold the circle in half, then half again.
Now, position the point of the petal in the center of the base. Stitch from the bottom of the base through the point of the petal. Stitch back down through the point of the petal and the base.
Continue doing this with the remaining petals. I did three different fabrics and decided to layer each one separately. You can mix the patterns up, keep it all simple...do what ever you want!
Once you have all your petals on, cut a small circle out of a coordinating fabric and stitch it onto place in the center of your layered petals.
1.15.2011
blossom
All over blogland I have seen different women making adorable crafts with super cute little fabric flowers all over them. I love love love the fabric flowers. As you know, from my flower hair clip tutorial...I'm kind of addicted to big flowers. Lord knows, when I have a child (quite a ways down the road) my little girls will have huge flowers attached to their heads almost constantly!
I love that these flowers can be attached to anything. You can attach a pin or a clip to the back of these flowers and use them in a million and a half different ways. Or, just simply stitch them right on to a project to add some pizazz!
Well, I found a super simply tutorial over at Little Miss Momma on how to make these no sew flowers. I followed it and am SO pleased with the outcome. I used three different kinds of fabric on my flower, you can use more or less...anything you want!
First, cut out circles from your desired fabric(s). These circle do not have to be exact in any way shape of form. How many circle you will need depends on how full you want your flower to be. Be sure to cut a smaller circle out of a thick fabric to act as your base.
Next, take one circle and scrunch it up by grabbing the center.
Dap hot glue on the scrunched tip of the petal and glue it to the middle of the base you cut out earlier
Continue doing this and filling it the base with the other circle you have cut out.

I love that these flowers can be attached to anything. You can attach a pin or a clip to the back of these flowers and use them in a million and a half different ways. Or, just simply stitch them right on to a project to add some pizazz!
Well, I found a super simply tutorial over at Little Miss Momma on how to make these no sew flowers. I followed it and am SO pleased with the outcome. I used three different kinds of fabric on my flower, you can use more or less...anything you want!
First, cut out circles from your desired fabric(s). These circle do not have to be exact in any way shape of form. How many circle you will need depends on how full you want your flower to be. Be sure to cut a smaller circle out of a thick fabric to act as your base.
Next, take one circle and scrunch it up by grabbing the center.
Dap hot glue on the scrunched tip of the petal and glue it to the middle of the base you cut out earlier
Continue doing this and filling it the base with the other circle you have cut out.
Subscribe to:
Posts (Atom)

